Nikon D750 vs D810: Which should you choose for night photography?

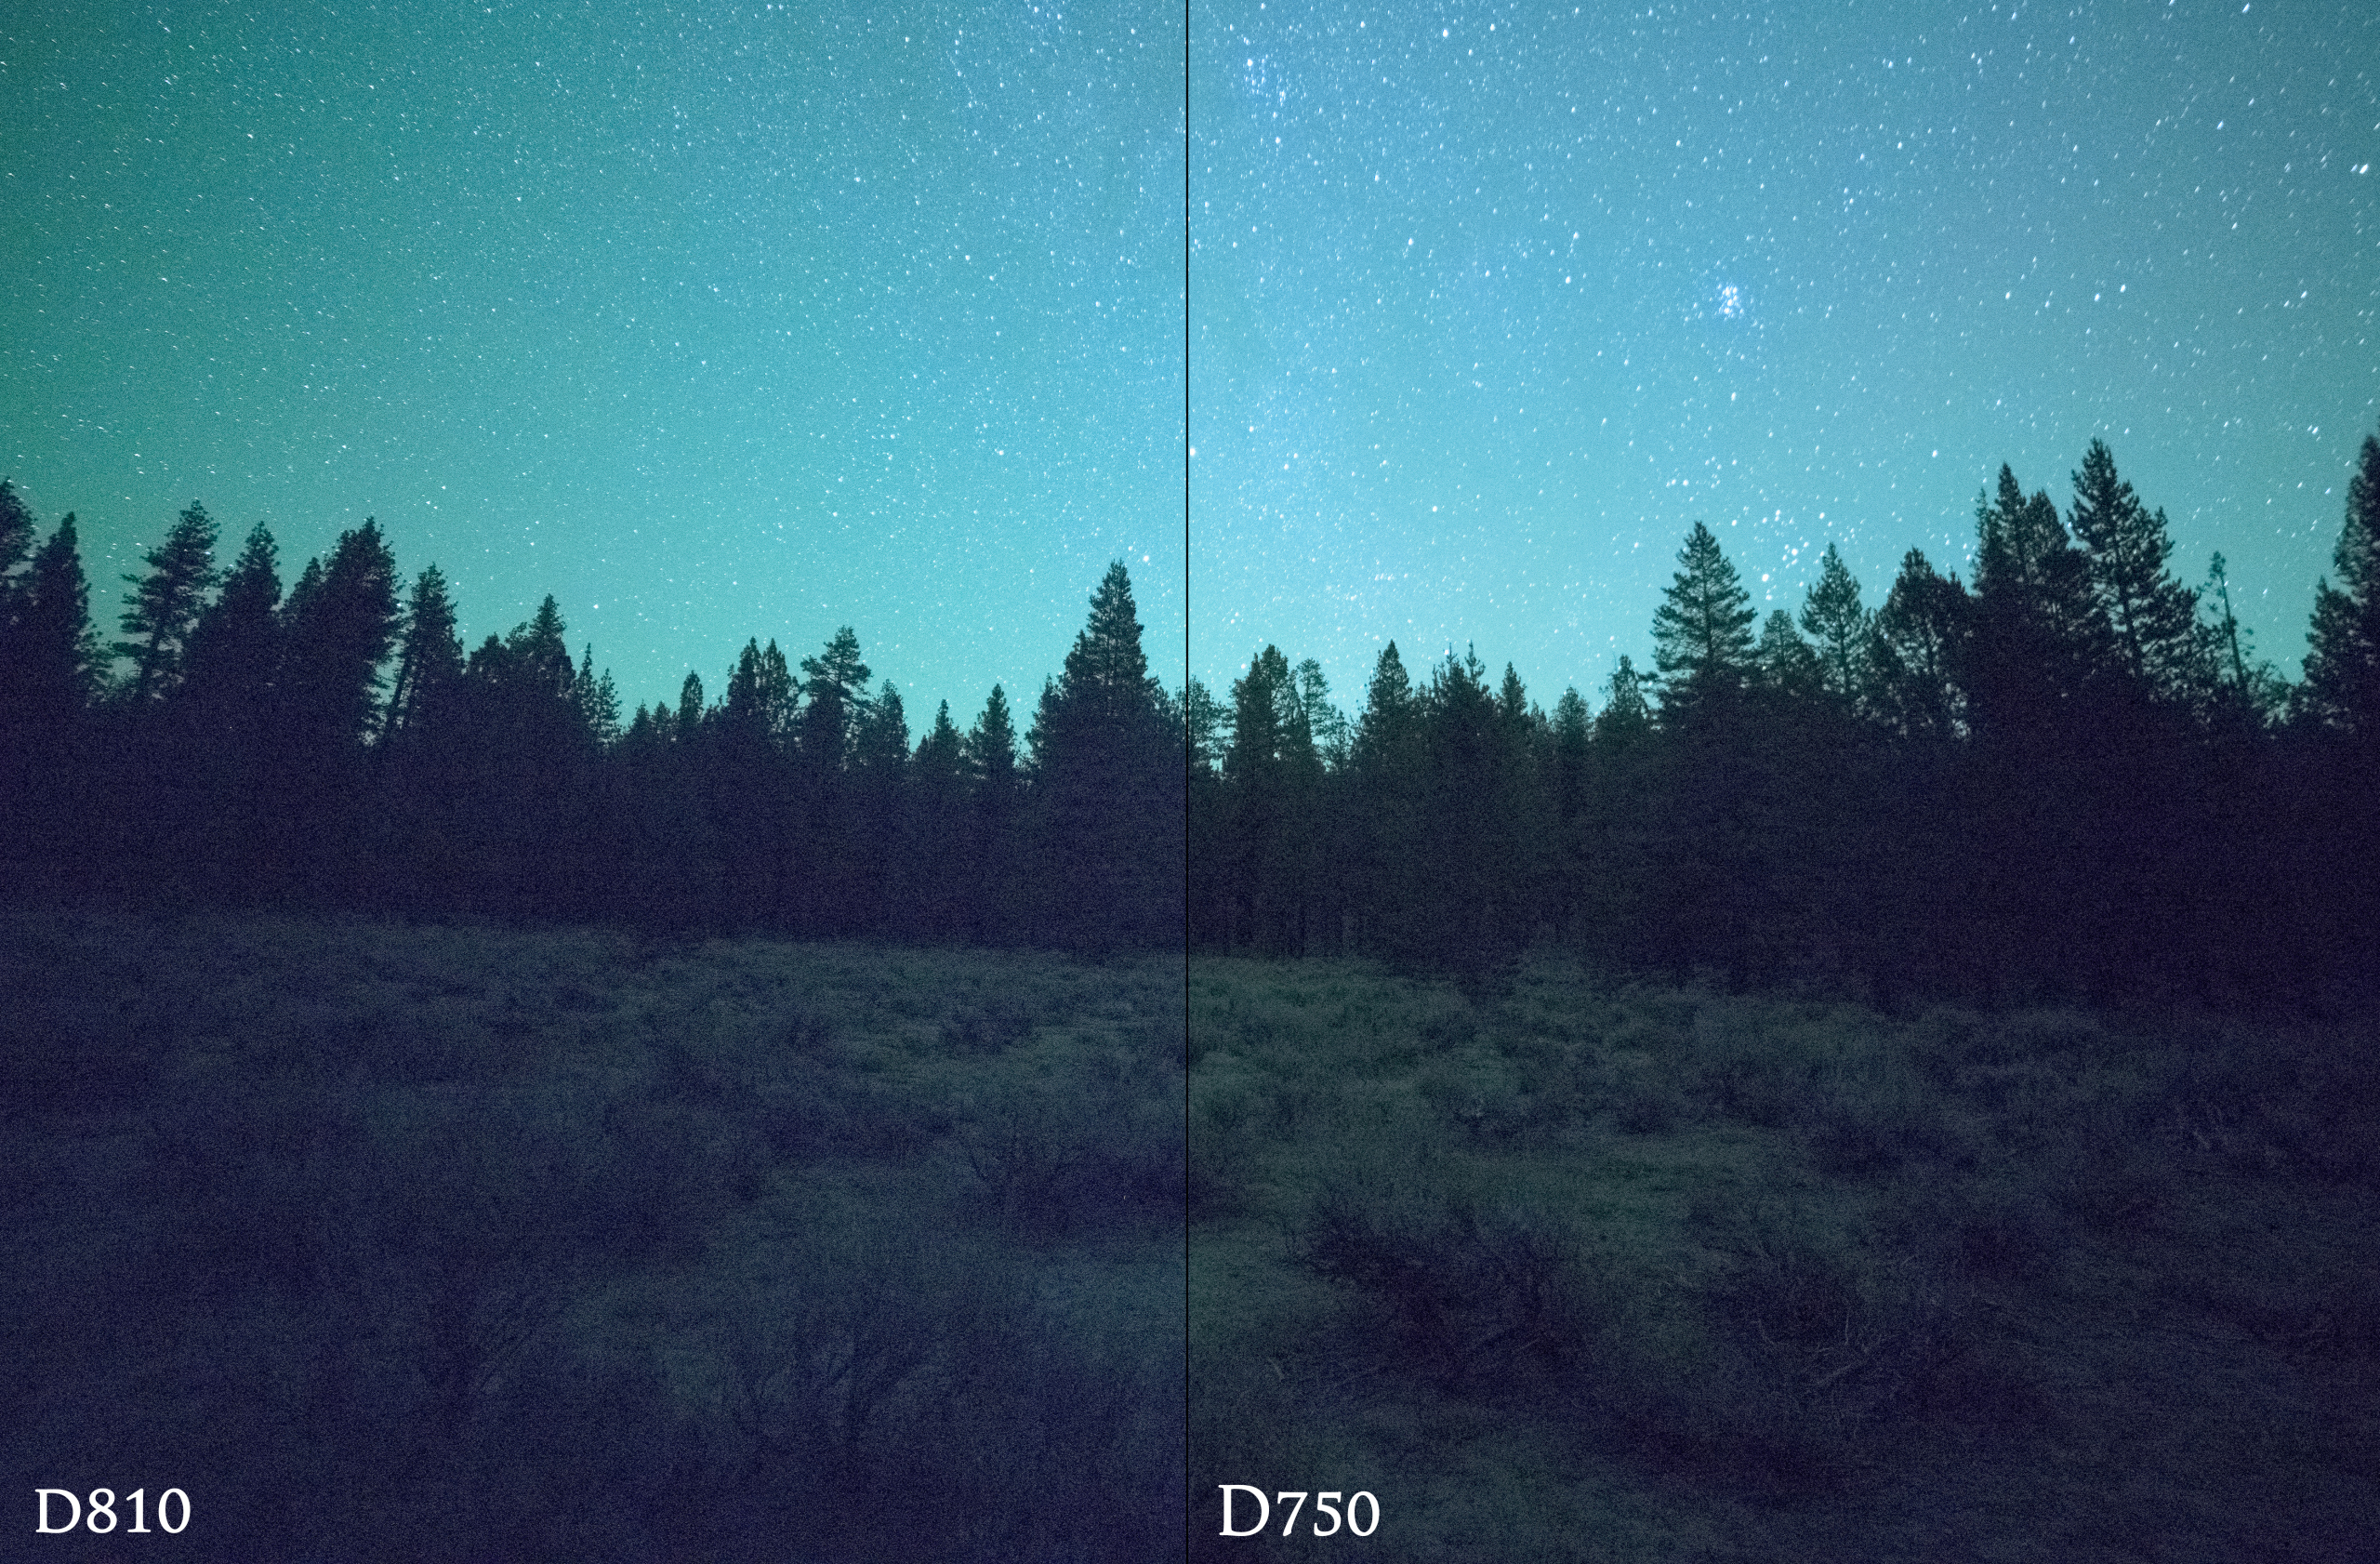
A lot of people have been asking me which camera they should buy between Nikon’s two new beauties: the Nikon D750 and the Nikon D810. Both are amazing machines but it’s a bit like comparing a Corvette to a Land Cruiser: they’ll both get you from point A to point B just fine but their real strengths lie in different areas.

Since I’ve been getting more and more into night photography in recent years I need a camera that can produce clean images at high ISOs. So I decided to pit the D750 and the D810 head to head and see which camera came out on top for night images.

To make the tests as controlled as possible I used the exact same setup for each camera: Same tripod (and hence same composition), the same lens (a 14mm Rokinon f/2.8), and the same settings (f/2.8, ISO6400, WB2650K, 14mm). Because noise is a factor not only of ISO but also of how much ambient light you have to work with I deliberately chose a scene that would really stress the camera and bring out a maximum amount of noise: photographing a small clearing in a forest on a moonless night. I also wanted to investigate how well the in-camera high ISO noise reduction worked versus using a post-processing noise reduction workflow. First I took three images with the D810, using No in- camera NR, Low in-camera NR, and finally Medium in-camera NR. Then I swapped the Rokinon to the D750 and repeated the series.

Taking the images into Photoshop I boosted each raw file by +2 stops in exposure (putting each shot at the equivalent of 25,600 ISO, which is pretty damn high!) but otherwise left all adjustments at their default, null values. Then I resized the D810 files to be the same width as the D750 files, 6016 px. It was immediately clear that the D750 was the top performer. Not surprising given the newly designed sensor and the lower pixel density. But still I think it’s interesting to note that not only does the D750 retain more detail in the deep shadows but it also demonstrates higher dynamic range, with more contrast and less muddiness in the foreground. Click the image below for the full-res file.

Nikon D750 v sD810 high ISO comparison


And here’s a detailed view of the two cameras’ performance:

D810 high ISO detailD750 high ISO detail

CONCLUSION 1: The D750 wins at high ISOs

But what about the second question, is it worth using High ISO NR in the camera or not? Well one thing I learned from this exercise which really surprised me is that if you’re shooting raw it doesn’t matter AT ALL whether or not you have this turned on. The High ISO NR clearly affected my SOOC jpegs but once I opened the raw files in Photoshop to compare them there was absolutely no difference in the files. At first I thought that might be because Nikon used a proprietary algorithm to smooth noise in the camera that Photoshop couldn’t understand. But when I looked at the files in Nikon Capture NX-D I still had a hard time telling a qualitative difference between the noise in the three images.

In camera NR test

Of course this got me to thinking: if in camera NR doesn’t do anything at all, what is the best way to reduce noise in my night photography images? Now, I’m sure there are many elaborate techniques for reducing high ISO noise but I’m a simple guy and so if I can find a simple solution to the problem, great. So in this case I tested a couple of easy methods: 1) using a 3rd-party noise reduction plugin called Neat Image, 2) using Photoshop’s Luminance Noise Reduction in Adobe Camera Raw, and 3) using a combination of the two. I conducted these NR methods on three copies of a single raw file from the D750 and compared the results.

For me, Neat Image usually works fantastically but in this case it was unable to get a good sample of noise to do its analysis. If I sampled on the stars it did a poor job because of the complexity of the star field, and if I sampled on the dark trees it over-smoothed the image, leading to strange artifacts. So I let it sample automatically and perform NR based on that. Next I pulled a different copy of that raw file into ACR and adjusted the luminance noise (you should note in all cases I pulled color noise reduction up to 100) until it seemed to give me an equivalent level of detail to what I saw in the Neat Image file (the luminance value ended up at 30, with detail at 50). Finally, I ran Neat Image on another copy of the raw file that had its luminance noise adjusted.
NR comparisons detail

For me personally I prefer the ACR luminance adjusted file. Even though it’s noisier than the other two, I prefer the even look to the noise. The Neat Image file looks artifacty to my eye, and the file with the combination of the two looks over-smooth. One observation I found interesting is how clean the sky looks in all of these cases. Goes to show you that with even a little bit of ambient light the D750 makes clean images at super high ISOs.

As for the foreground, well that level of detail and noise still isn’t quite usable for a nice image for me. Granted, this was an extreme case designed to push the limits of the sensor. In all likelihood I generally won’t be trying to get good results when shooting pitch black trees. Instead I’ll most likely stick to my preferred method of taking a foreground exposure just after twilight in order to get great depth of field, detail, and quality, and then blending that image with a star shot from later. And for those photos, there’s no question I’ll be reaching for my D750 without qualms.

The Thug Life

Digital imaging and software packages like Photoshop have led to a groundbreaking revolution in composite photography. I love compositing because it frees you up creatively. There are no limits to the images you can create. Dangerous and fantastical adventures, underwater worlds, and magical moments. Nothing is out of bounds, and the only things limiting the images you can achieve are your creativity and your Photoshop skillz. I’ve been getting more into composites lately so I thought I would spruce up a self portrait I took in the summer of 2011 by adding a gritty background to it.

When shooting portraits with artificial lights I love a three-light setup with the key light being a large, somewhat soft light on-axis with the subject, and two harder lights behind the subject and high up left and right in order to provide a cool rim light for the portrait. This setup creates a punchy, almost 3D look that is really cool. Here’s a shot showing the basic lighting setup:

Four light setup for composite portrait

You can see in this shot that I used a fourth light directly behind me for some additional separation from the background. I like this look even more than the 3 light setup, but here I ultimately decided to nix the separation light simply because my background was too cluttered. So after ditching this light and getting my pose down, here’s the straight-out-of-camera version of my final portrait:

Three light setup for composite portrait

When I originally processed this image I wanted to make a complete joke of the tough guy look so I added some cartoon tattoos. You’ll also noticed that I ditched the background completely.

Thug Life portrait from Santa Cruz photographer Josh Cripps

But like I said, I’ve been improving my compositing skills, as well as realizing that a good background really makes or breaks an image, so I wanted to re-process the shot and composite it into a background. I wanted something a little grungy and urban so I used this shot of an alley in downtown Santa Cruz.

Santa Cruz downtown alley

My portrait was fairly easy to cut out cleanly in Photoshop because it was simply on a dark background, so I moved the alley background behind the cutout portrait and free transformed it until the perspective matched.

santa cruz composite portrait

Then to get the two images to blend together smoothly I adjusted the hue and saturation of each, added some noise to the image, and used a gradient map to further match the colors. There was also quite a bit of dodging and burning I did to help stylize the image. And voila, the final result:

santa cruz composite portrait

Looking for images like this? Contact me for a portrait session.

Or if you want to improve your own composite skills, check out the awesome tutorials from the ever-inspiring Aaron Nace over at Phlearn. I also recommend the book Photoshop Compositing Secrets by Matt Kloskowski.

Frustrated by Picture Framing? Try doing it yourself!

Picture framing can be a hassle.  Ready-made frames often offer a cheap solution, but not all pictures fit standard sizes, and the ready-made frames can be low quality as well.  Professional picture framing is a sure-fire way to get a great result, but also a sure-fire way to break the bank; often it costs more than the art you want to frame!  But there is another alternative: to do the framing yourself.  Perhaps a daunting prospect at first glance, but I propose that with the right tools and time, anyone can do their own picture framing, get a great result, and save a boatload of cash.

Read more