Frustrated by Picture Framing? Try doing it yourself!
Joshua Cripps
Picture framing can be a hassle. Ready-made frames often offer a cheap solution, but not all pictures fit standard sizes, and the ready-made frames can be low quality as well. Professional picture framing is a sure-fire way to get a great result, but also a sure-fire way to break the bank; often it costs more than the art you want to frame! But there is another alternative: to do the framing yourself. Perhaps a daunting prospect at first glance, but I propose that with the right tools and time, anyone can do their own picture framing, get a great result, and save a boatload of cash.

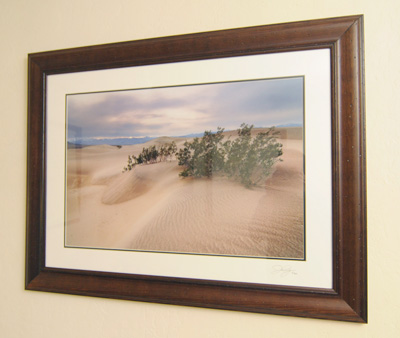
I recently framed a 20″x30″ print of one of my photos from Death Valley. The print was matted with a 3″ white mat (with a 1/4″ blank inner mat) and framed with a custom 3-1/2″ dark walnut frame I ordered online from framesbymail.com. This was by far the largest piece I’ve ever framed and as such was not without its challenges. Nevertheless, in the end the piece came out great.
Best of all for you, I filmed the whole process and put together a video tutorial highlighting the best practices I used and some of the issues I ran into along the way. Check out the three part series below.
Part 1: Matting and Mounting
Part 2: Cleaning the Glass and Setting the Print
Part 3: Finishing Touches
And the cost of doing this myself? Here’s the breakdown:
- 26″x36″ Walnut Frame – $110
- 3″ White Mat + 1/4″ Black Inner Mat – $29
- Mat / Frame Shipping – $27
- Glass – $22
- Acid-Free Foamcore – $8
- Scrap mat board + picture wire + hangers + glue – $5
—————————
- Total – $201
So there you have it, this is probably half of what you’d pay to have a piece this size professionally framed. Not that there aren’t downsides to this route. Obviously doing the framing yourself is not without technical challenges, especially for a piece this large. Here are my major lessons learned from this process:
1) I had the mat window cut with just 1/8″ overlap around the edges of the print. This made it extremely hard to correctly align the mat window with the print. In the future for large prints like this 20×30, I’m going to have the mat? cut with at least 1/4″ – 1/2″ overlap on all sides.
2) For ease of handling, I had my photo lab pre-mount the print onto a piece of 2mm styrene plastic, which had its pros and cons. Pros: it was very easy to handle and I could be assured that the mounting was perfect. Cons: the print required a much stronger adhesive to hold it into place and the extra thickness of the styrene made it much more difficult to align the print with the mat window.
My plan for next time is to have the photo mounted into? the center of a large piece of acid-free foamboard. This should run about the same price as mounting it onto the styrene. Then I’ll be able to easily line up the mat window with the print and cut the foamboard exactly to size around the edge of the mat. It will be much easier to get the alignment of the print, mat, and foamboard perfect and not have to worry about trimming things down like I had to do with this piece.
3) The piece of glass I used for this piece was 26″x36″. That much glass reflects a lot of light! The photo is hanging in my bedroom right now and during the day I can hardly see the print for all the glare off the glass. Even though I don’t really like non-glare glass because it slightly diffuses the color, clarity, and detail of the print, it may be necessary to go that route with a larger piece. Either that or I need to find a new place to hang this piece.
I’m planning on framing another large 20″x30″ print sometime in the next month or two. When I do, I’ll be sure to post updates here about how the process went.
Questions? Comments? Let me know!
~Josh
share this article:


