
[av_textblock size=” av-medium-font-size=” av-small-font-size=” av-mini-font-size=” font_color=” color=” id=” custom_class=” av_uid=’av-k8y2zjrl’ admin_preview_bg=”]
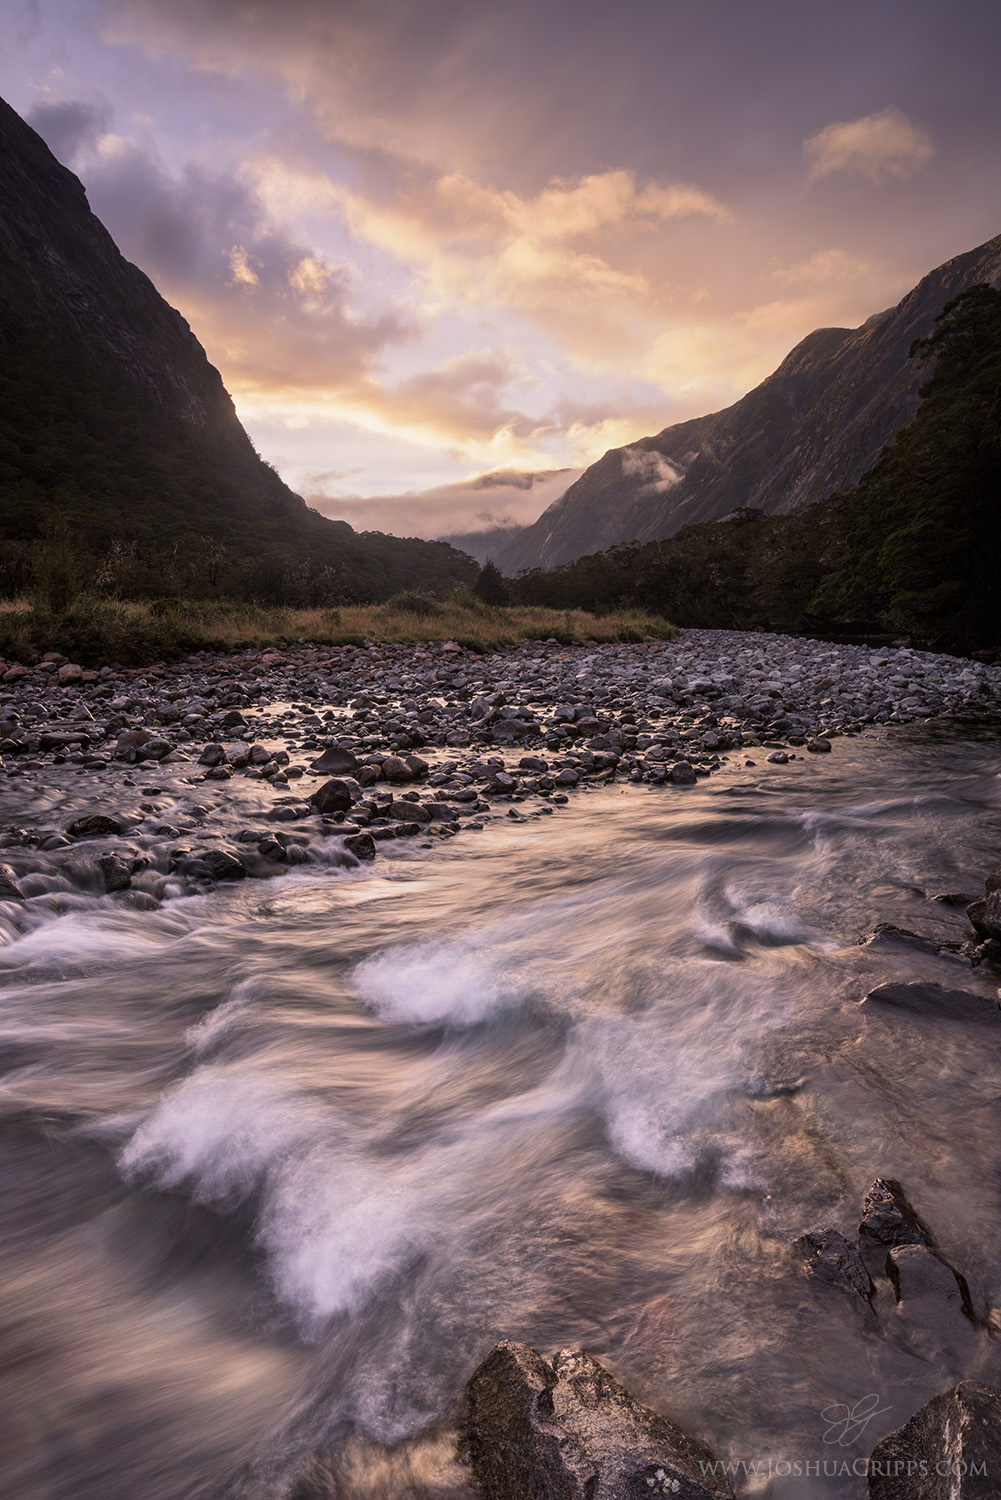
In April of 2015 when I was photographing the sunrise at Monkey Creek in Fiordland National Park in New Zealand I found myself in a tricky situation that’s very common in landscape photography: the sky was lighting up brightly with vibrant colors, but the surrounding mountains were still in deep shadow, creating a massive range of bright and dark tones in the scene. And not only was I trying capture this huge dynamic range but I was also intent on photographing the movement of the creek rushing by my feet. I knew I wanted everything in focus as well. So this meant that in my exposure I had to solve four major problems: capturing all the details in the shadows, capturing all the details in the highlights, obtaining sufficient depth of field, and targeting my shutter speed to capture the motion I wanted in the creek. It was a lot of variables to juggle, but by applying some fundamental principles of photography I was able to solve all four problems to create this shot. Here’s my process:
Using my wide angle lens to capture a good chunk of the sky, the mountains, and the creek, I found that I got the most pleasing balance to the composition and minimized some distracting elements by zooming in to 23mm. Next, because I knew I’d need as much dynamic range as I could squeeze out of my camera I set my ISO to its lowest setting, 64 in this case. Then, because I had somewhat zoomed in my wide lens and was fairly close to my foreground I guessed I’d need an f-stop of around f/16 to get sufficient depth of field. I dialed that in, set my focus roughly 1/3 into the frame, and used Live View to check my sharpness. I needed to fine tune the focus position a little bit but after a minor tweak everything was indeed sharp from front to back, great!
Because the shadows were quite dark and the highlights so bright I knew my camera would have a tough time capturing the details in both tonal ranges. So I used a graduated neutral density filter to help compress the dynamic range of the scene. Placing the dark part of the filter over the top half of my frame I was able to darken the sky with respect to my foreground. Of course, this had the unwanted side effect of further darkening the already-dark mountains in the top half of the frame. However, digital cameras have incredible abilities when it comes to capturing shadow detail, so I knew that I was better off darkening the highlights to a capture-able level. Even though this meant the shadowy mountains got darker, it was very unlikely they’d get so dark I couldn’t recover their details in post. Whenever I’m faced with a situation like this my mantra is: expose for the highlights, recover the shadows.
With my dynamic range compressed, and my f-stop and ISO set, the next step was to find a shutter speed that would give me a good exposure. I used the exposure simulation histogram on my Live View to dial in an initial shutter speed of 1.3″ and hit the button. Since this preview histogram is just a guess made by the camera I couldn’t be sure my exposure was correct until I checked the “real” histogram (along with the Highlight Warning) displayed via image playback. In this case, both showed some slight overexposure and blown highlights, although the histogram showed my shadow details were all intact. So I reduced my shutter speed to 1″ and tried again. This time the playback histogram showed no blown highlights and no clipped shadows. Yes! A perfect exposure!
However, there was still a problem: at a 1″ shutter the water in the creek was too smooth for my tastes: a soft, silky blur. While I often love that creamy look, in this case I wanted to capture a little more action in the lively movement of the stream. I couldn’t simply shorten my shutter speed to freeze the water, because then I would start to severely underexpose the image. So to shorten my shutter I needed to compromise somewhere else. The easiest place to start was aperture; if I opened it up at the same time as I shortened my shutter my exposure would stay the same. However, I didn’t want to risk losing depth of field, so I took baby steps. From f/16 I moved to f/14 and found everything was still sharp. Then f/13, and even f/11 were still good. But below that the foreground and distant mountains began softening. So I stayed at f/11, which allowed me to change my shutter speed from 1″ to 1/2″, resulting in a dramatic change in the way the water looked. It kept the smooth parts of the creek silky and sinuous, but that shorter shutter froze more of the action in the bubbling and rollicking parts of the stream. It was a perfect sweet spot in my mind. So then I fired off a final shot, again checking my histogram and highlight warning to make sure I’d nailed the exposure.
[/av_textblock]
[av_promobox button=’no’ label=’Click me’ link=’manually,http://’ link_target=” color=’theme-color’ custom_bg=’#444444′ custom_font=’#ffffff’ size=’large’ icon_select=’no’ icon=’ue800′ font=’entypo-fontello’ box_color=” box_custom_font=’#ffffff’ box_custom_bg=’#444444′ box_custom_border=’#333333′ av_uid=’av-42tx4c’]
Side note: If you aren’t sure how to use the histogram to perfect your exposures and create an in-field workflow like the one I just described, please check out this great video course, Histograms Exposed, from my friends Varina and Jay Patel. In the course they discuss what a histogram is and what it represents. They tell you how to view it on your camera along with the highlight exposure warning. They break down the different kinds of histograms and which is best to use. Varina and Jay also fully explain the most important part of a histogram: what it’s telling you about the exposure and contrast of your photo so you can get great exposures. And they also provide their in-field workflow to give you a system to analyze a scene and to use your histogram to get a good exposure every time.
[/av_promobox]
[av_textblock size=” av-medium-font-size=” av-small-font-size=” av-mini-font-size=” font_color=” color=” av-desktop-hide=” av-medium-hide=” av-small-hide=” av-mini-hide=” id=” custom_class=” av_uid=”]
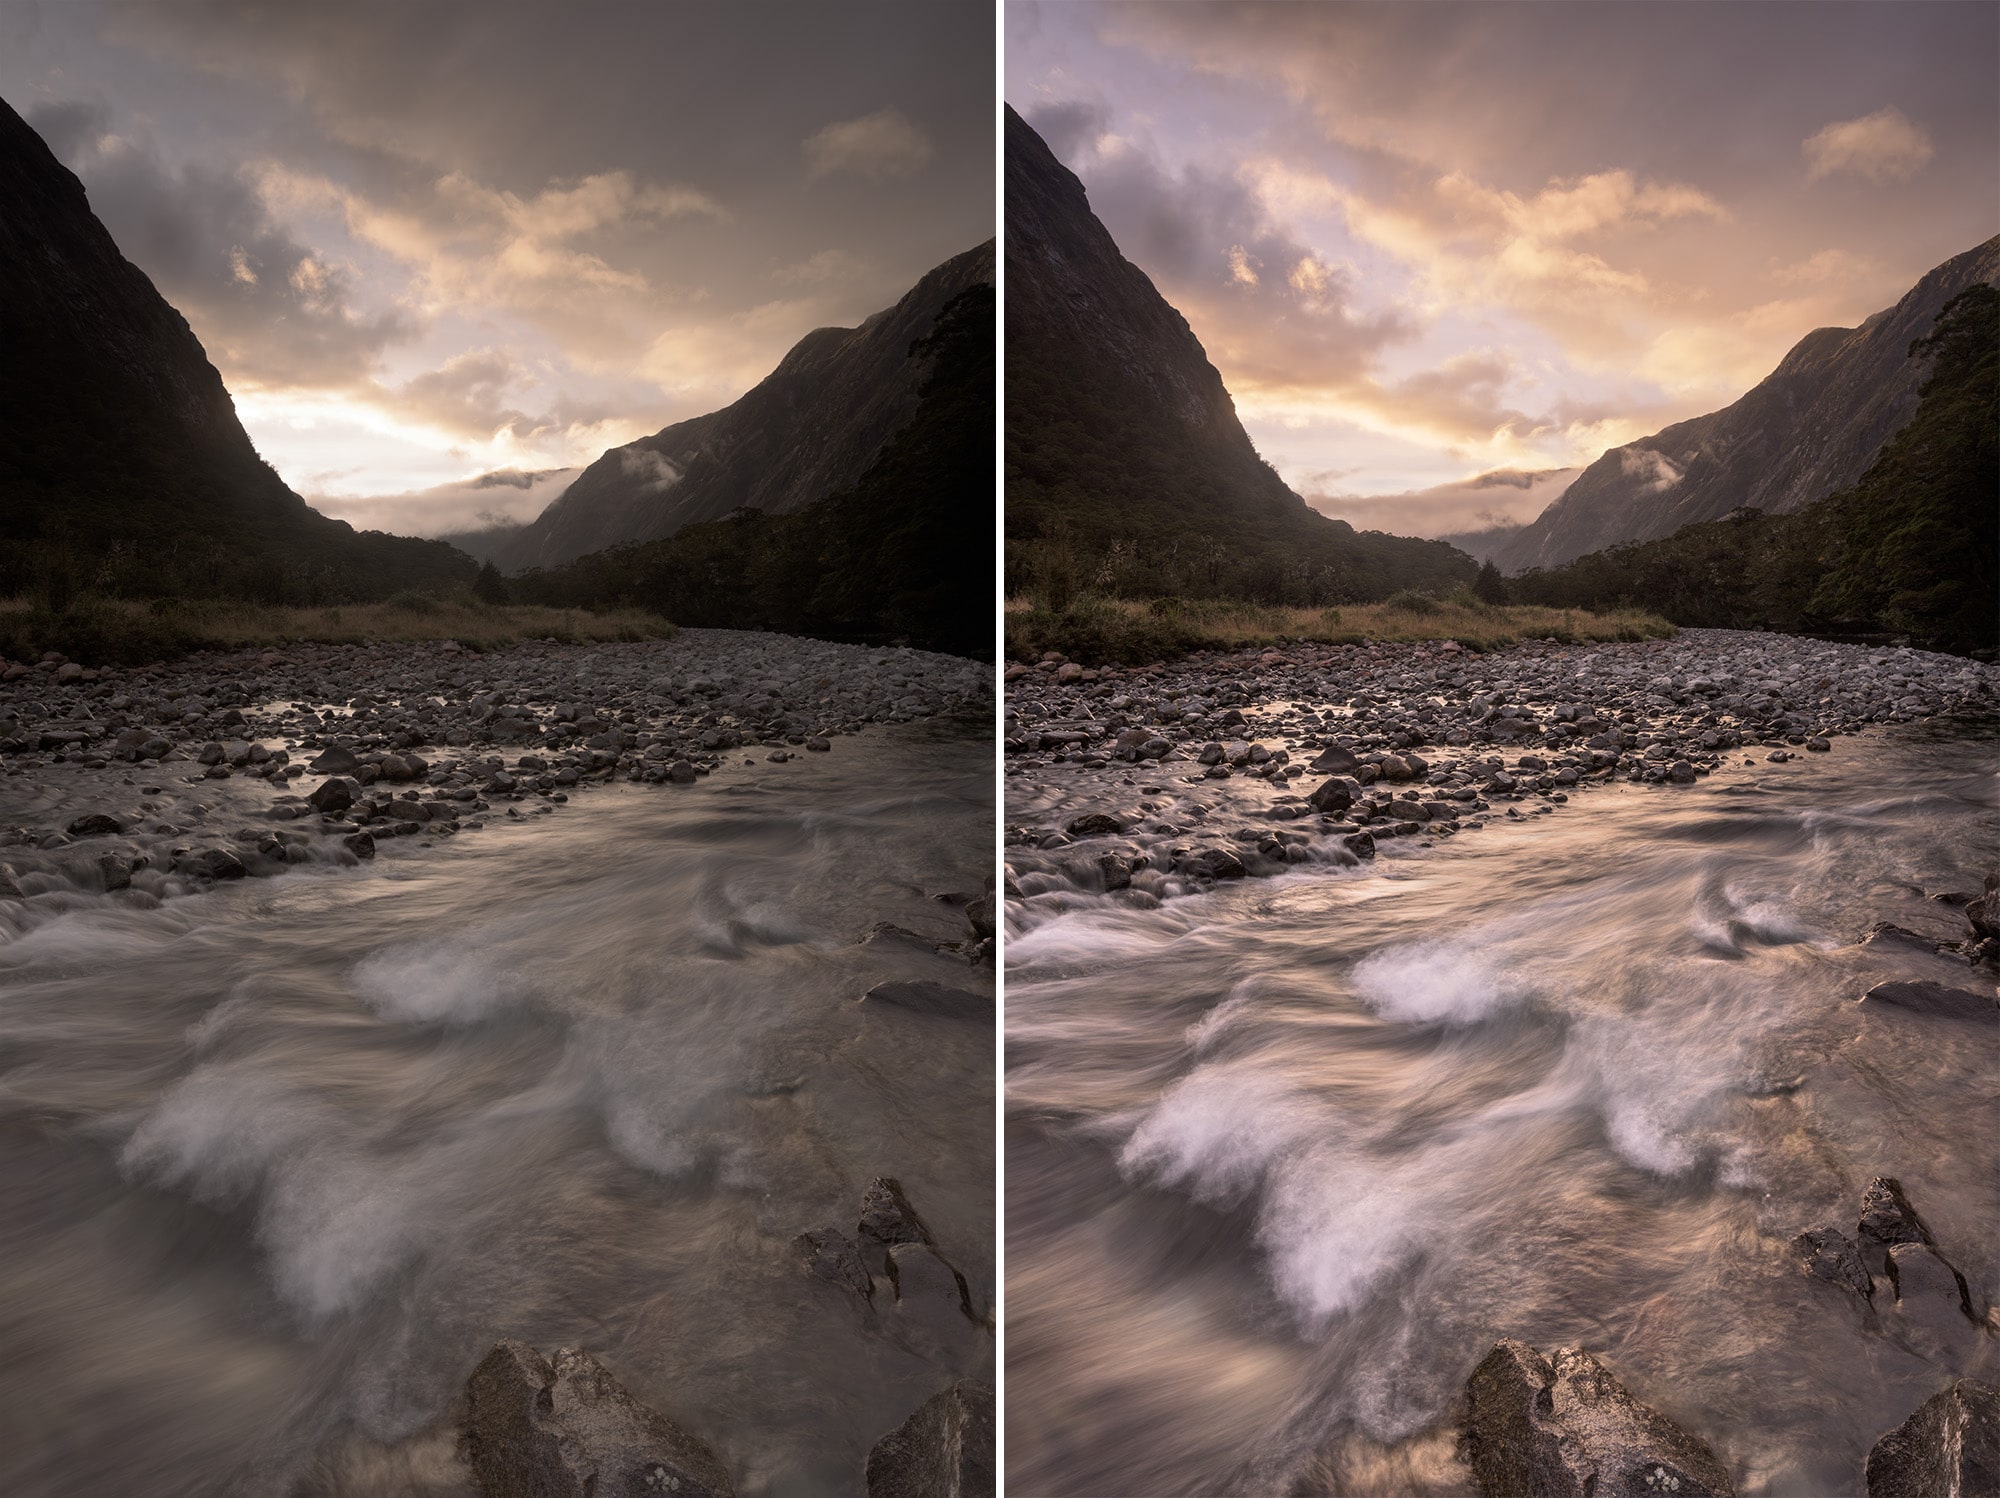
Of course, the raw file that my camera produced was very flat and boring. It had all the shadow and highlight detail, but it lacked the color, the punch, and the drama I felt while photographing the scene. So the next step was to bring the image to life in Adobe Camera Raw. And while the before and after results may look dramatically different, the processing was fairly straightforward. I boosted the exposure and shadows, then reduced the highlights. I warmed up the white balance and added a kiss of magenta. I added some clarity for local contrast and made increases to the saturation and vibrance. I then used the tone curve to increase the global contrast of the photo, along with a graduated filter to further brighten the foreground and add contrast and punch. Et voila! The final image.
[/av_textblock]
[av_promobox button=’no’ label=’Click me’ link=’manually,http://’ link_target=” color=’theme-color’ custom_bg=’#444444′ custom_font=’#ffffff’ size=’large’ icon_select=’no’ icon=’ue800′ font=’entypo-fontello’ box_color=” box_custom_font=’#ffffff’ box_custom_bg=’#444444′ box_custom_border=’#333333′ av_uid=’av-75evw’]
Another side note: If that last paragraph sounded like Greek to you, check out my 2-hr video course, The Complete Guide to Adobe Camera Raw. I teach you how to do everything I just said and lots more in super easy, bite-sized chunks.
[/av_promobox]
[av_textblock size=” av-medium-font-size=” av-small-font-size=” av-mini-font-size=” font_color=” color=” id=” custom_class=” av_uid=’av-k8y2zrky’ admin_preview_bg=”]
And there you have it, a step-by-step explanation to the thought processes behind this image. Let me know your thoughts or questions in the comments below!
~Josh
Got another question? Check out our Landscape Photography FAQ here:
https://www.joshuacripps.com/landscape-photography-faq/
Be sure to subscribe to our newsletter and YouTube channel for even more landscape photography how-to.
Join Josh on Social!
http://instagram.com/joshuacrippsphotography
https://www.facebook.com/JoshuaCrippsPhotography
[/av_textblock]


2 Responses
Thank you once again Josh. I enjoy watching your videos, and have learned something new or different every time I do. You have a wonderful way of explaining photography, so that anyone can learn from your presentations (Beginner —> Expert). I’ve been “making” photography for around 48 years now, and you have proven that you can teach an “Old Dog” new tricks. 🙂
Hey Gary, thanks for that wonderful comment! So happy to hear my ramblings have been helpful to you. 🙂 Take care and happy shooting!
Josh