Notes From the Field: Foggy Fun
Joshua Cripps
is a photographer, teacher, and writer living in the spectacular Eastern Sierra.
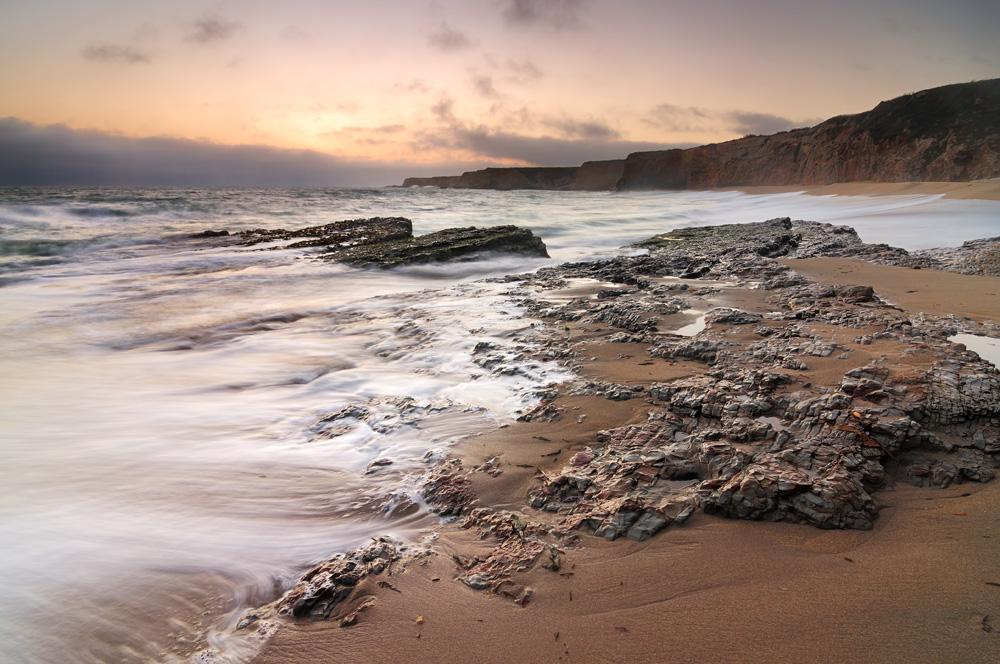
Shooting seascapes in the summer in Santa Cruz (say that 5-times fast) is a tricky thing: the marine layer inhibits sunsets and makes capturing a worthwhile image all the more difficult. I rarely go out to shoot in the summer here, but since some excellent photographer friends of mine were in town, I made a point of going out to shoot with them, and was happy to come home with this shot.
How did I battle the fog and still come home with a nice image? Full details after the jump
—————————————–
Technical Notes on This Shot
—————————————-
ISO 100
12 mm
f/10
1 sec
3-stop LEE soft GND
Camera Settings and Filter Use
When shooting the ocean I nearly always aim for a shutter speed in the 0.5 – 2 second range because it gives a sense of motion while retaining some form and definition in the water. This is just a personal preference, and just one of many ways to do things. Nevertheless, that’s what I was shooting for (yuk yuk) on this evening. By this point in the evening, the sun had gone down behind the fog bank, so there wasn’t too much ambient light to deal with. So with a shutter speed of ~1 second as my goal and by using the built in light meter of my camera and chimping until I got a foreground exposure that looked right, I settled on the settings you see above. In theory I could’ve used ISO 200 (one stop higher than ISO 100) because it provides the highest capturable dynamic range on the D300, but in order to maintain the shutter speed I wanted, I would have had to stop down to f/14 (one stop lower than f/10). Both would provide the same exposure with the same shutter speed, but since I was using a 3-stop filter and I was shooting into the wind, I wanted to de-focus any sea-spray drops that landed on the filter as much as possible. Shooting at f/10 versus f/14 helped me do that.
Then in order to balance the sky with the foreground, I used a LEE 3-stop soft GND at a slight angle with the full density beginning just along the edges of the bluff.
Composition and Timing
Because of the unpredictable nature of the ocean, composing seascapes can sometimes be a tricky thing. Depending on what the waves are doing in your shot, the balance and feel of your comp can change dramatically from frame to frame. So I always try to pre-visualize the final look that I want and compose around that idea. In this shot I wanted to capture the waves pulling away from the rocks in the foreground so I watched the surf for a little while to get a feel for its behavior, then I got to work composing.
First of all I used the rule of thirds to place my horizon about a third of the way down the frame in order to give the bulk of the photo over to the cool rocks in the foreground. Then I got down fairly low (maybe 3 feet off the sand) to get a more up close and personal feel. The most important aspect of this comp was arranging the rocks. Just based on where I was standing the rocks kind swept away from me out toward the horizon. In this kind of situation you have two important considerations: where you want the closest rocks to appear in your frame, and where you want the farthest rocks to appear in your frame. This allows you to direct your viewer’s attention exactly where you want through the image. And if you’re unsure of what to do, you can almost always fall back on the ol’ rule of thirds, which is pretty much all I did here. If you imagine a central point to all the rocks on the right-hand-side in the foreground, you can see that it lies pretty close to the 1/3 point in the lower RHS. I then finessed the location of my camera and the direction it was pointing until the farthest rocks lay roughly on the 1/3 point on the upper LHS. Note also that this is where the brightest, and most attention-getting part of the sky is. This is not a coincidence. 🙂
Once my composition was locked in, I simply waited for the right wave to roll in, and this one was just about perfect: less water and the streaks would feel more like an after thought in the images. More water and the wash would start obscuring the rocks on the RHS of my frame and possible mess up the balance of the comp. As for timing, I waited until the wave came up the beach, paused at its apex, and then just as it started to swirl back down the sand I snapped the shot.
Post-Processing
Once I got home and reviewed my images I realized that the 3-stop GND wan’t dense enough to provide as much rich color in the sky as I would’ve liked, so I decided to process the raw file twice (once for the sky and once for the foreground) and then blend them together.
For the sky, in the raw converter I pulled the exposure down about 1/3 stop and then used a curves adjustment to drop the midtones and highlights to deepen the glow. I then did some local brightness adjustments to bring the cliffs back up out of the deepening shadows I had created by dimming the image. I also warmed up the shot a little bit for two reasons: 1) in low light my D300 tends to shoot cool (actually most cameras do for reasons I won’t go into here), and 2) a warmer WB helped the coloration of the image out immensely.
I pretty much left the foreground alone, except for a slight curves adjustment for added global contrast and some localized contrast adjustments to add texture and glow to the water streaks.
I exported both to Photoshop and did some selective sharpening for the rocks and the cliffs then I combined the sky and foreground images with a vector mask with a gradient blend and some high-radius, low-opacity brushing to get rid of the grad line.
And that’s the scoop on this one. Until next time!
~Josh
share this article:
Facebook
Twitter
Pinterest


